LAB #4
CSC 101
Document Processing in Word & more on Mulberry
R Mohammadi
September 1998
Objectives:
Using Microsoft Word, learn to modify and format documents,
Using Mulberry receive and store documents
About this lab ...
You will need your 3.5" disk for this lab. It is assumed that you have already done lab module #3and had a document named lab3. If you don’t have a disk, you need to get one before doing this lab.
1. Receiving Documents in Mulberry.
Start Mulberry, by Clicking on Start, Clicking on Programs, and point/click Mulberry.
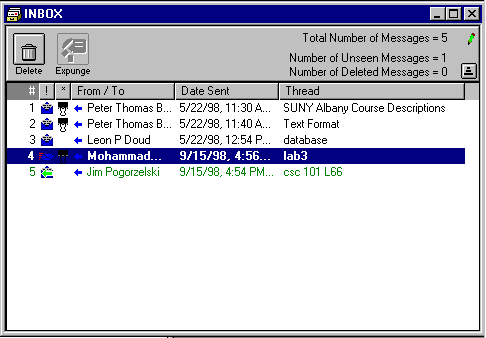 You must login with Mulberry using your ICC username/password. You should now see a list of mail folders in a sub-window on the left and your INBOX folder open on the right. INBOX folder is where your incoming mail is stored. Each row represents an incoming mail.
One of the entries in your INBOX is titled lab3. Highlight the lab3 entry and double-click to open it.
The information in the header portion of the window for lab3 is important. The purpose of the From, To, and Subject fields should be obvious. The CC stands for Carbon Copy; it is used when a copy of the mail message is send to individuals other than person(s) whom the mail is directed to. The Sent field gives the date and time when the mail was sent. The Delete Button has the obvious meaning as it deletes the message from your INBOX. The Reply button lets you respond back to the sender with a message. The Forward button lets you send this message to someone else. As far as retrieving the lab3 document is concerned, the Parts field is consequential. Note that there is a 2 in that field.
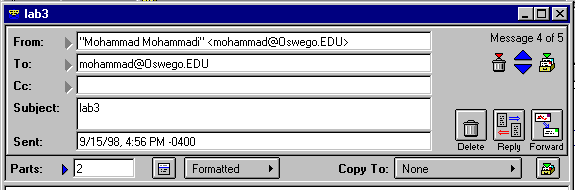
The ArrowHead next to the Parts field implies that Parts is an expandable field. Click on the ArrowHead. You should see the following expansion. Note that the first entry shown identifies the message body, which in this case should be empty, but the second entry should be the lab3 document as identified by its name.
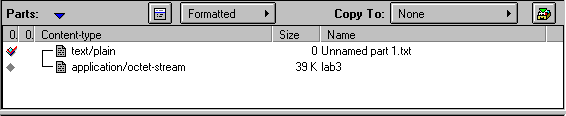
Double-click the lab3 attachment.
Click on the OK button when asked if you want to extract this part.
The Save As window will pop up; change file name to lab4.doc. Make sure you have your disk in the floppy drive. Highlight the 3 ½ Floppy (A:) in the Save In list window. Click Save.
When asked, if you wish to open this document, click Cancel. Ask your lab instructor to check to make sure you retrieved the document correctly.
2. Learn to Modify and Format Documents with Microsoft Office Starts Here.
- Place your CD for Microsoft Office Starts Here in your CD-ROM Drive. Click the
Quit button if a dialog box comes up to auto-start the software.
 Start Microsoft Office Starts Here by clicking the Icon on your desktop.
You will encounter several dialog boxes cancel them until you only have the main window for the software up. It is ok if your progress is not saved at this point.
Choose the Basics by clicking on it.

on the left hand side of the Window under Sections, pick
Click on the second lesson Enter, Modify, and Organize Text Button in the middle of the window.
Watch the clip if you like by clicking the view Introduction button.
Start lesson by clicking the button for it.
You should now see the Enter, Modify, and Organize Text lesson control dialog box. You control the lesson via the arrow keys on the lower right side of the dialog box. The right-arrow moves you forward through the lesson, and the left-arrow moves you back.
Click on the right arrow to get started. Be sure to finish all four phases of this lesson, once you finish the 4th phase that teaches you about copying text, you will return to the main page for Microsoft Office Starts Here.
Take Quiz by clicking on its button. Be sure to let your lab instructor see the results before you continue.
Close the window by clicking on the X in its upper right hand corner.
Modifying a Document
 Start Microsoft Word, by Clicking on Start, Clicking on Programs, and point/click Microsoft Word. A Word window should be on your screen.
Click the Open Button
Start Microsoft Word, by Clicking on Start, Clicking on Programs, and point/click Microsoft Word. A Word window should be on your screen.
Click the Open Button
Locate and open the lab4 document on your 3-½ disk.
I have bolded the changes that I want you to make to the text, make the changes.
Had I but ded an hour befor this chance,
I had lived a blessed time; for, from this instant,
There’s nothing serious in mortality:
All is but toys; renown nad grace is dead;
The wine of life is drawn, nad the mere lees
Is left this vault to brag of.
-MACBETH, Act II, Scene III

Run the Spell/Grammar check.
Spell checking is one of the most typical document changing operations. The spell checker in Word is designed to locate words that may be misspelled and identify sentences that are grammatically incorrect; you’ll have the opportunity to correct them as the spell checker goes through the document. Click on the Change or Ignore buttons as you see fit, keeping in mind that when Word is correcting your spelling, it is not always the first word suggested that should replace your misspelling. You may choose to double-click on a word other than the first one suggested to replace your error.

 More on modifying the document
- Copy /Paste all text in the file, you should have two copies of the text when done with this step.
Highlight all text in the file, click on the Copy button, place cursor at the bottom of the file, and click on the Paste button.
- Changing the Font, Size and Style.
Some examples of Fonts: Times New Roman, Courier, Bookman
Some examples of sizes: 10,
14, 24
Some examples of styles: bold, Italic, Underlined, bold and Italic
- Highlight a word, any word.
- Click on the down-arrow button in the toolbar that appears after a Font name display (located in upper left-hand corner of screen). Your font is probably Times New Roman now.
- Change the font for the highlighted text to
Courier.
- Click on the down-arrow button in the toolbar after the size display. Your font size is probably 12 now.
- Change the font size for the highlighted word to
20.
Bold and Italic buttons located in the toolbar. This will change the style to Bold and Italic.

- Click the Save button to save your changes. Make sure that your lab instructor checks your work at this point.
5. Close the window by clicking on the X in its upper right hand corner. You have completed this lab.