LAB #9

CSC 101

Introduction to Databases

R Mohammadi

November1998


Objectives:


Using Microsoft Access, learn to...

create a database and store data in it.

update the data and database structure.

About this lab...

A Database in Microsoft Access is a collection of tables, with each table built from rows and columns. Microsoft Access also provides us with tools to query databases, report on their content, and build forms for data entry. For example, the database that we'll create today only has one table representing students and their grades. Each student in this database is represented with a record or row and the fields or columns for each record are the student name, GradeA, GradeB, and GradeC. Fields may contain text data such as the student name field; they could contain numeric data such as the field GradeA. You will see the use calculated fields such as a Total and Average in the next lab.


1. Learn to create a database, build a table, and mange records with Microsoft Office Starts Here.

    1. Insert your CD in the CD-ROM drive.
    2.  

    3. Start Microsoft Office Starts Here by clicking the Icon on your desktop.
    4.  

    5. Choose the Basics by clicking on it.
    6.  

    7. Under Sections, pick
    8.  

    9. Do the first three lessons, Create a Database File, Build a Table, and Manage Records.
    10.  

    11. Take Quiz after each lesson. Be sure to let your lab instructor see the results before you continue.
    12.  

    13. Close this window.


2. Starting Microsoft Access.

Start Microsoft Access by clicking on Start, clicking on Programs, and then clicking Microsoft Access. An Access window should be on your screen.


3. Create a Student Database.

    1. When you start up Access, an initial dialog box pops up that inquires if you want a blank database, start up database wizard, or open an existing database. Select Blank Database and Click OK.
    2. File New Database window will pop up, Change the Save In to 3 ½" Floppy (A:).
    3. Type lab9 for File name.
    4. Click Create.
    5. The lab9: Database window pops up.


4. Create a Table.

    1. With the Tables tab in front, simply click on New in the lab9: Database window.
    2. The New Table window will pop up. Choose Design View and click OK.
    3. Type the list of Field Names and their Data Types in the corresponding columns as shown below:
    4.  

    5. To get the key symbol next to ID, right-click on that button, your first choice will be Primary Key, click on it.
    6. Click the X in the upper right corner of the Table1:Table window.
    7. When asked if you wish to save Table1, click yes.
    8. Change the name of the table from Table1 to Student_grades. Click OK.

5. Enter data.

    1. With the Tables tab still in front and Student_grades highlighted, right-click on Student_grades and pick Open from the shortcut menu.
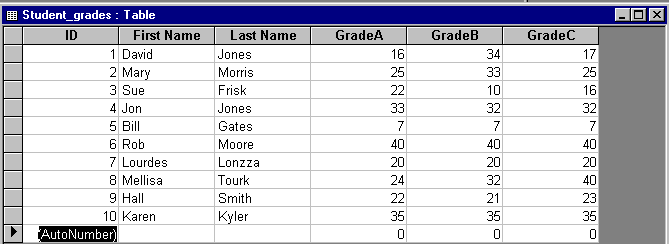
    2. Type the following student records; no need to enter anything for ID, as it will be automatically numbered.


6.Update Data Records.

    1. Right-Click on the button to the left of the student with ID=4.
    2. From the shortcut menu, pick Delete Record.
    3. When asked, if you wish to delete this record, click Yes.
    4. Change the GradeA for student with ID=10 to 40.
    5. Add a new record for Jon Jones, with grades 40, 40, and 40.

7. Update Table Structure.

    1. Right-Click in the header of the Student_grades: Table window.
    2. From the shortcut menu, pick Table Design.
    3. Add a GradeD field, which is a Number to the end of the list of fields.
    4. Again, close the window and save changes.
    5. Double-click on the Student_grades table to open it, you should notice the new field added on.

8. Save changes and logout.

  a. Click on to save your changes and show your work to the lab instructor.

b. Close your Access window and logout of the workstation.