LAB #11
CSC 101
Introduction to Presentation Tools
R Mohammadi
Objectives:
Using Microsoft PowerPoint, learn to...
Create a presentation
Incorporate Graph and Graphic objects into presentations
About this lab...
You will first learn the basic elements of creating
presentations via PowerPoint using MS Office Starts Here. Presentations
in PowerPoint are made from a set of slides. A slide is a one-page entity
that usually contains a title and text body and possibly graphics objects.
PowerPoint provides you with many tools for presenting these slides and
preparing them for printing handouts, or transparencies. You will need
your 3.5" disk for this lab.
1. Learn about presentations in PowerPoint with Microsoft
Office Starts Here.
-
Insert your CD in the CD-ROM drive.
-
Start Microsoft Office Starts Here by clicking the
Icon on your desktop.
-
Choose the Basics by clicking on it.
-
Under Sections, pick

e. Do the first three lessons, Create a presentation
the easy Way, Enter format and create text, Create new slides Graph and
Graphics.
-
Take Quiz after each lesson. Be sure to let your lab
instructor see the results before you continue.
-
Close this window.
2. Start Microsoft PowerPoint.
Start Microsoft
PowerPoint by clicking on Start, clicking on Programs, and
then clicking Microsoft PowerPoint. A PowerPoint window
should be on your screen.
3. Create an Electronic Flyer.
-
Choose Template in the PowerPoint window that comes up and
click ok.
-
Click on the Presentations tab in the New Presentation window.
-
Double-click on Flyer (standard). You should now have a Presentation1
window with the 1st slide of 2 slides showing.
4. Complete the Title page.
Your title page should look like what is shown at the
bottom of the handout.
-
Click in the textbox in the top portion of the page and type
Super Job Search.
-
Click in the textbox in the lower portion of the page and
type, Preparation three times, hitting Enter after each word.
-
Type IS KEY on the last line. You have completed the title
page of the presentation.
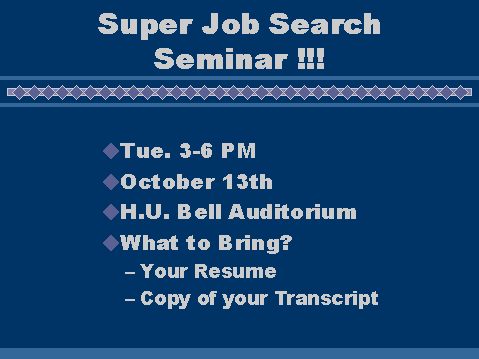
5. Enter the Information for the 2nd slide.
Your 2nd page should look like what is shown
at the bottom of the handout.
-
Using the scrollbar on the right of the window, switch to
the 2nd slide.
-
Replace the title textbox with the following, this time,
highlight the title text and replace it with the new text:
Super Job Search
Seminar !!!
-
Highlight Time of Day and replace with 3-6 PM.
-
Highlight Date and replace with Tues. 10/13.
-
Highlight Location and replace with H.U. Bell Auditorium.
-
Highlight Other important Info and replace with What
to Bring?
-
Highlight what to bring on the next line and type
Resume.
-
Highlight directions and type Copy of Transcript.
-
Delete the RSVP line. You have now completed the second
slide.
6. Create the 3rd slide.
Your 3rd page should look like what is shown
at the bottom of the handout.
-
To create a new slide to add to this presentation hit Ctrl-M
which is the shortcut key for it.
-
In the New Slide Window that pops up, pick Clip
Art & Text layout by double-clicking it; this layout is the 2nd
choice in the 3rd row.
-
Click in the Title textbox and type What is Covered?
-
Click in the textbox on the right.
-
Change font to Times New Roman and font size to 24.
-
In the Format pull-down menu, choose Bullet
-
Uncheck Use a bullet at the top of the Bullet popup
window and click OK.
-
Type the following:
Career Services Specifically for Seniors;
Resume/Cover Letter/Thank You Note Writing;
Interviewing Strategies;
Technology and the Job Search;
Job Search Strategies - Networking.
-
Double-click on the clipart icon on the left, which takes
you to Microsoft Clip Gallery 3.0 to choose a clipart.
-
Choose People at Work as the category on the left
side of the clipart gallery window.
-
Choose a relevant clipart like the one below and choose Insert.
You completed the 3rd slide.
-
In the lower left corner of the window, there are five icons
side by side
 ; they control the
view of the presentations. Try them out.
; they control the
view of the presentations. Try them out.
7. Save your presentation.
Save this presentation as LAB11 on your 3
½" Floppy (A:). You have now completed the lab. Be sure to have
the lab instructor check your work and logout of the workstation.